Setup
I haven't found a standard for EOG electrode placement as EEG. It's a large signal (1mV p-p from my measurement); it should be easy to collect anyway. I decided to follow the set up from EEG hacker to compare results with Chip's trial. Hardware and electrodes were the same as the last post. Below is the adapter from DIN 1.5mm touch-proof connector to regular breadboard jumper wire.
 |
| Gold cup EEG electrode secured by bandage. The reference electrode is on the right. |
Result
I started with the eye blink artifact. I looked forward and blinked every 5s. The signal is very clear, strong and significant. We can use this signal for some simple computer interfaces such as playing a shooting game, sending a confirmation command of for a BCI application.
 |
| Eye blink test |
I applied a notch filter on top of the original high pass filter. The result is amazing! It's very sharp signal.
For the next trial, I looked forward for 10s and looked down for 5s. I designed two different intervals so I could easily differentiate two states. I may add another marking channel to ArmBrain board which takes a button input as a marker for a new state.
The result is sufficient for classifying the two states. The mean of forward state signal is higher than 0 baseline and the down state is well below the 0 baseline. I notice that the noise level for this trial is higher than the previous one. It's about 0.5mV p-p compares to 0.3mVp-p of the former data set. Also, I wonder if those spikes in the looking forward portion belongs to eye blink artifact. I may record videos for my trials to match with the result later.
 |
| Look Down Test |
I retried again with a looking forward and up combination. I still got an acceptable graph. A distinct gap presents between the baseline of two states though the signal is not stable as last trial. The baseline drifted and, noise level increased.
 |
| Look up test |
I call this a successful measuring session. I got satisfactory results. I have never known about EOG before. I want to thanks Chip from EEGhacker for his detail documentation.
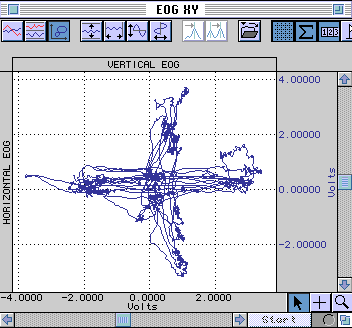
Next step: - try different setups to track eyeball movement like the sample below from BIOPAC.
- measuring EOG by EEG electrode location
- build a blink detection system for some fun applications
 |
| BIOPACK XY tracking |


![Collecting EOG signal with ArmBrain [updated]](https://blogger.googleusercontent.com/img/b/R29vZ2xl/AVvXsEjFH993QMRp5DYsPuZHiu_vGHrjby-6vaeZp74FSg9uOhs0LBTQxDjiYyX7uATCbJHFxs7fUD-Gm3CBzZQT8E8zZM_-cCKpnUH-hWatEbvlTMIw_Ijtt7yD_nmT9GP5KcAhL_8slA8hcyfs/s72-c/IMG_20140604_185728.jpg)

![SSVEP based BCI game with my hardware WEEG [Video]](https://blogger.googleusercontent.com/img/b/R29vZ2xl/AVvXsEiVCXMzDEj3lRtJKoFkgkRLYxsN9wbGm0H_hPYt1ZrpMbxgX71J6hQ-UyQoFg6FGypxuFc0cqLLktyQEWmd93wiN3t3iw1ea7p4imkf1U9rJD55tD7RdHywt3KlaJeG5OA9sMD9yIosbJKS/s72-c/ssvep+model+with+weeg.jpg)


